HTC One 2013 - Personal Review


Got a feel of the brand new unlocked phone from HTC this year and felt like sharing my thoughts here. The first thing I liked about the phone is its looks and how it felt on my hand. The phone comes in a zero gap perfect metal case with all the buttons neatly tucked in giving it a seamless appearance and soothing feel to the palms. HTC have got it right with the phone dimensions and it is very comfortable to operate the phone on one hand. The phone's curvy back felt a bit odd when I first held the phone but I think we will get used to this shape and might start feeling better as days go by. The power button is moved to top which I think is a good idea as I always ended up squeezing the power button while adjusting volume on other android phones. The power button also doubles up as an infrared port which can be used for remote control. I didn't quite like the roughness of the scales on the volume adjust button on the right as it was not a good feeling on my fingers while adjusting volume. Apart from that HTC One deserves a top rating on the form factor and the tactile side of the body of the phone. 

HTC One powered by the Android operating system delivers all the goodness of Android along with a few custom specialties  The HTC Blinkfeed is a gift for users to read news feeds and social network updates from the home screen. The Blinkfeed could well have been inspired by Live Tiles of the Windows platform but certainly looks a lot more cleaner and efficient in terms of home screen real estate utilization. HTC One has also embraced Google Now which is like the Siri of the Apple world and it can be easily accessed by long pressing the home button. Google Now can be handy outdoors getting you the right information at the right time. The Video Highlights feature lets you instantly create a short mash-up movie from your existing images and videos in the gallery.

HTC One also shines on the entertainment factor. With 468 PPI the HTC One display screen is easily the best I have seen on smart phones so far and watching high definition video on this high resolution screen is a bliss to our visual senses. The camera is a 4MP "UltraPixel" camera which I would have preferred to be at least 8MP. But the camera comes with a lot of valuable features like the HTC Zoe and Slow Motion recording. HTC Zoe captures a series of images continuously for 3 seconds which can be later edited using the inbuilt photo editor. The photo editor presents a gamut of picture editing options and features that enable you to edit and retouch your photos on the phone without the need for an external application. The gallery also has the preview feature that plays videos and Zoe captures one by one within the small frames of the gallery screen. Another interesting aspect of the phone is its speakers and the HTC BoomSound. With beats audio enabled, one can actually feel the energy of the dual front facing stereo speakers powering away the sound waves towards you. Again a top rating for the display and the speakers. 

One thing I found a little annoying is that one couldn't access the frequently used functions such as WiFi, Screen Rotate, GPS, etc by a drag down of the status bar or notification panel on the home screen. Just as I thought we need to go to settings every time, I realized that you can add these shortcuts as widget on one of your home screens. I was also wondering how to access the recently accessed applications but later found out that one simply has to double tap the home button to access the multitasking screen and close those apps which we don't want to be running in the background. 

While the phone has that sleek looks and sophisticated software elements, I have my doubts over the phone heating up pretty quickly which you could feel on your palms while working with the phone over an extended period of time. I wonder if it is because of the metal casing that the heat gets to your hands sooner than expected. Overall HTC One is a brilliant phone with all the hardwork put in by HTC and it will certainly satisfy an average smartphone user any day.

Tutorial to continuously measure the Bluetooth RSSI of a connected Android device (Java)


Bluecove RSSI Polling Android
Bluetooth RSSI - Nexus7 & Nokia Xpress Music
At the time of this writing, there is no Android API available to continuously retrieve the RSSI of an existing bluetooth connection even though API exists for getting WiFi RSSI. The current API will get the Bluetooth RSSI only during the initial connection setup process. In this article we will find out how to continuously get the Bluetooth RSSI of an Android device and a Nokia Mobile Phone from a computer running Linux.

The RSSI of any device connected to the computer can be determined by using the hcitool in Linux. But this may not be possible with commercial Android devices as root access is required in order to call any functions from the Bluetooth HCI layer using the Android NDK. For experimental purposes, in order to exploit the bluetooth equipment onboard commercial handheld devices, we shall measure the RSSI of these devices by connecting them to a computer or a laptop.

In this experiment the RSSI is being measured continuously in motion from an Android Device (Nexus 7 Tablet) and a Nokia Mobile Phone (Xpress Music) from a computer based on Ubuntu. The source code uses the Bluecove bluetooth library to extract the RSSI information from these connected devices. The Android device and the Nokia device acts like a server and the computer acts like a client.

At the computer, we need to write the client code that will continuously poll the RSSI from our known devices. In order to do this we need to first checkout the bluecove bluetooth libraries from here (http://bluecove.org/source-repository.html). Then we can make use of the BluetoothRSSIPollingClient.java to get the RSSI readings. We can filter out the other discovered devices using the Bluetooth MAC address of our known devices. We can obtain the Bluetooth MAC address of a device from the Preferences Tab of the Bluetooth Menu in Ubuntu after connecting the device with the computer.

Client:

public void PollRSSI()
{
try {
while(true)
                 {
        try {
        System.out.println();
        if(Android_Device != null)
        System.out.println("Android RSSI = " + RemoteDeviceHelper.readRSSI(Android_Device));
     } catch (Exception e) { System.out.println("Android RSSI = Connection Error"); }
        try {
        if(Nokia != null)
        System.out.println("Nokia RSSI = " + RemoteDeviceHelper.readRSSI(Nokia));
      } catch (Exception e) { System.out.println("Nokia RSSI = Connection Error"); }   
        Thread.sleep(2000);
                }
     } catch (Exception e){ e.printStackTrace(); }
}

For the Android device we need to write our own server code in order to overcome the [13] Permission denied error. We might need to run more than one server thread (AcceptThread.java) on the Android device so the incoming connection request will be finally accepted after an initial permission denied error. We will also specify the RFCOMM UUID and a Service name which the client can search and connect to. The entire server has to be implemented as a Service in Android (BluetoothRSSIService.java) so that the connection is not lost if the display screen is timed out.

Server:

public AcceptThread()
{
                   BluetoothServerSocket tmp = null;
                   mBluetooth = BluetoothAdapter.getDefaultAdapter();
                   mUuid = UUID.fromString("00000003-0000-1000-8000-00805F9B34FB");
        try {
                tmp = mBluetooth.listenUsingInsecureRfcommWithServiceRecord("BluetoothCustomService",      mUuid);          
             } catch (IOException e) { }
                myServerSocket = tmp;
         }

public void onCreate()
{
super.onCreate();

thread1 = new Thread(new AcceptThread());
thread1.start(); //First thread will often be denied
thread2 = new Thread(new AcceptThread());
thread2.start(); //Most probably be accepted

}

For the Nokia device there is no explicit server necessary and we can simply connect using the Bluetooth Serial Port Profile connection url. Once the connection is establish we can continuously poll the RSSI from both the devices periodically.

Note: RSSI of Bluetooth may not be an efficient and reliable parameter for applications such as indoor positioning

Source Code:

BluetoothRSSIPollingClient.java       AcceptThread.java       BluetoothRSSIService.java

References:

"A Bluetooth Based Supermarket Navigation System" - Pearl Manoharan, Vignesh Subramanian & Anusha Vutukuri - Course Project - Mobile Systems 16:332:559:02 F12 (Rutgers Fall 2012) -->
http://developer.android.com/guide/topics/connectivity/bluetooth.html
http://stackoverflow.com/questions/12251785/android-bluetooth-read-rssi-signal-strength
http://bluecove.org/bluecove-examples/bluecove-tester/index.html

How to execute SPEC95 benchmarks in Simplescalar?

Let us see how to run the SPEC95 benchmarks (little endian) namely compress95, anagram, go, cc1 and perl in Simplescalar simulator software. Each and every benchmark has a corresponding input file that specifies the input to the program and an output file which we can use to verify if our test was successful. Also we will be writing the output of our simulation to a file with a .out extension and we will be printing the execution trace with all the run statistics to a file with a .trace extension.

The little endian version of the benchmarks and the input and output files can be download from the below location. After extracting the archive,  place the folder BenchMarks_Little in the simplesim-3.0 folder of your simplescalar installation folder. All the benchmarks shall be executed from the simplesim-3.0 directory.

BenchMarks_Little.tar.gz

compress95:

The below command will execute the compress95 benchmark and print the output to compress95.out and log the execution trace to compress95.trace in the Results folder

./sim-outorder BenchMarks_Little/Programs/compress95.ss < BenchMarks_Little/Input/compress95.in  2> BenchMarks_Little/Results/compress95.trace > BenchMarks_Little/Results/compress95.out

go:

The below command will execute the go benchmark and print the output to go.out and log the execution trace to go.trace in the Results folder

./sim-outorder BenchMarks_Little/Programs/go.ss 50 9 BenchMarks_Little/Input/2stone9.in  2> BenchMarks_Little/Results/go.trace > BenchMarks_Little/Results/go.out

anagram:

Before executing the anagram program place the words file from the Input folder in the simplesim-3.0 directory. The below command will execute the anagram benchmark and print the output to anagram.out and log the execution trace to anagram.trace in the Results folder

./sim-outorder BenchMarks_Little/Programs/anagram.ss words < BenchMarks_Little/Input/anagram.in  2> BenchMarks_Little/Results/anagram.trace > BenchMarks_Little/Results/anagram.out

cc1:

The below command will execute the cc1 benchmark and print the output to 1stmt.s in the Programs folder and log the execution trace to cc1.trace in the Results folder

./sim-outorder BenchMarks_Little/Programs/cc1.ss -O BenchMarks_Little/Input/1stmt.i 2> BenchMarks_Little/Results/cc1.trace

perl:

Before executing the perl program place the perl-tests.pl file from the Input folder in the simplesim-3.0 directory. The below command will execute the perl benchmark and print the output to perl.out and log the execution trace to perl.trace in the Results folder

./sim-outorder BenchMarks_Little/Programs/perl.ss < perl-tests.pl 2> BenchMarks_Little/Results/perl.trace > BenchMarks_Little/Results/perl.out

References:

http://www.simplescalar.com/
http://www.igoy.in/simplescalar-installation-made-simple/
http://users.ece.gatech.edu/~hamblen/4100/course/simplescalar/Spec95%20Benchmark%
20Command%20Lines.htm
http://www.spec.org/osg/cpu95/

The MegaPixel (MP) Rating of a Digital Camera

The resolution of a digital camera is perceived to be proportional to its pixel count. A digital image is nothing but a continuous arrangement of pixels or picture elements. Resolution is expressed as the number of horizontal pixels multiplied by the number of vertical pixels (E.g. 1600x1200 => 1.92 MP). Digital cameras record visual image with the help of CCD or CMOS sensors and each pixel of the output image on screen will map to a specific pixel on the image sensor in the digital camera.

Digital Camera Resolution Formula MegapixelDigital Camera CCD CMOS PixelMegapixel Resolution Myth

In order to improve the resolution, one tends to simply increase the pixel count. The more the number of pixels the more details the image will provide and the more it will resemble to the real world image. But for a given image or sensor area, increasing the number of pixels tends to saturate at a certain point and further increase in pixels doesn't mean much to the human eye. A common man will not be able to accurately identify the difference in quality of a usual 10cm x 15cm photograph taken by digital cameras having resolution greater than 5 MP. But higher pixel count will be beneficial only when you are trying to generate a bigger picture from a smaller one or when you are trying to crop a particular portion of the picture and try to enlarge it.

There are some common misinterpretations of resolution which a camera manufacturer might try to exploit. Since resolution is more like a square function (length x height), gain in pixel count will not be directly related to resolution gain. Also some pixels on a digital camera sensor will be used for other compensation mechanisms and not really for capturing the image. Companies may include this overhead in order to bump up the pixel rating. In color displays such as LCD screens, subpixel rendering is used in which a single pixel will be composed of a three sub pixels (R, G & B) and so the pixel count should never be exaggerated. The size of the camera sensor also plays a part in deciding resolution, sharpness and image quality for digital cameras having the same pixel rating apart from other factors like lens quality, sensitivity of the image sensors, optical zoom capability, shutter speed, etc.

Triangulation/Trilateration in GPS

Global Positioning System (GPS) has made a tremendous impact in our life and has become immensely popular in recent times. GPS receivers are omnipresent and the applications of GPS extend beyond technology purposes. At the core of this wonderful technology is a simple mathematical/geometrical concept called trilateration or triangualation. Imagine you are lost one day and you don't even know if you are on the northern or southern hemisphere. All that you have is a GPS device with you to locate yourself.

To start off, you are situated somewhere on the surface of the earth (Now don't tell that the earth is not a perfect sphere). Your GPS device receives position and time (sent) information from GPS satellites and the distance is calculated based on the standard distance-time formula given the fact that radio signals from GPS satellites travel roughly with the speed of light. The key problem here is that you don't know the direction but you only know the distance from a satellite.
-->
-->


Consider the blue sphere as the earth E. We are trying to locate a point P on the surface of the earth.

When your GPS device calculates the distance x from satellite say S1, you know that you might be located anywhere on the surface of a sphere of radius x with S1 as the centre. But you don't know in which precise angle you are located in the 360 degrees. Now when your GPS device gets hold of another satellite S2 and calculates the distance y from it, you can apply the geometric principle that spheres intersect in a perfect circle to narrow down your position to somewhere on the perimeter of a circle. Now, the point at which this circle intersects with the earth should give your location on earth. Now when your GPS device calculates the distance z from a third satellite S3, the sphere of radius z with S3 as centre will intersect the circle of intersection of the other two spheres at two points. Only one of those two intersection points will actually lie on the surface of the earth and the other point will lie in space. The point on the surface of the earth will give your location on earth.

GPS satellites transmit time information derived from high accuracy atomic clocks but the GPS receivers cannot afford such high precision clocks. There are several factors that might introduce errors in GPS like clock inaccuracies, rounding errors, multipath and atmospheric effects, etc. Since the earth is also not a perfect sphere, GPS receivers generally look to four or more satellites to compute the precise location.

AppFabric Caching (aka Velocity Caching) - Microsoft .NET

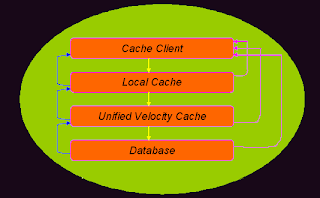
Caching is an essential component to speed up any web application by minimizing the number of trips to the actual database. AppFabric Caching or Velocity caching is a distributed caching system that leverages the caching infrastructure available across a cluster of cache servers efficiently to enhance application performance as well as scalability. The secret behind the effectiveness of appfabric caching lies in the fact that duplicate data is not cached by the cache cluster because whenever data is requested by any client, it is first looked up in the unified logical cache and if available the data that reaches the client can be from the physical cache memory of any of the servers in the cluster.

Appfabric Velocity Caching Architecture Design Overview Diagram

Velocity caching is implemented in a synchronized tier and the service can be accessed across the network with the cache servers in the cluster running the process (DistributedCache.exe). Even though several cache servers contribute to the shared cache memory, there is a common gateway for data to enter and exit in the form of a centralized and shared cache. The distributed cache is handled in code with the help of simple get and put methods that will retrieve, insert, update or delete data items in the unified logical cache as a whole. The programmer is not worried about the internal implementation or the physical location of cached data in the cluster.

Notable Aspects:
  • Each server in the cluster stores the session object data in its RAM and does not write it to disk for obvious reasons
  • No code change or new code has to be incorporated by the programmer and all that is needed is to change a configuration setting in order to activate velocity caching
  • Distributed caching means multiple web servers can each run an instance of the same application which helps in load balancing
  • Both web server (IIS) and cache server (Appfabric) can be deployed on a single application server running on Windows Server OS
  • Turning on the high-availability feature helps mitigate situations when a server in the cluster goes down by storing a synchronous secondary copy of the data item on a different server
One of the key challenges for the implementation of velocity caching involves managing parallel access to data that changes rapidly and velocity caching offers different concurrency models suitable for the concerned application. Controlling access to sensitive data among the clients is another challenge which is controlled by limiting access to such data with encryption or restricted accounts. Appfabric caching attempts to maximize the benefits from the underlying computer infrastructure with the help of a distributed yet shared architecture to provide value for both application developers and end users. Things can only get better from here.